Building a Dining Table Base: A Comprehensive Guide
Constructing a dining table base is a rewarding project that allows for customization and cost savings compared to purchasing a pre-made table. This article provides a detailed guide on designing and building a sturdy and aesthetically pleasing dining table base. The process involves careful planning, material selection, precise cutting, and secure joinery techniques. The complexity of the project can vary depending on the chosen design, ranging from simple "A-frame" legs to more elaborate pedestal or trestle bases.
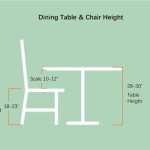
The first step in building a dining table base is to determine the desired dimensions and style of the finished table. This decision will directly impact the material requirements and construction methods. Consider the size and shape of the tabletop that will be used, as the base must be appropriately proportioned and capable of supporting its weight. A small, round tabletop will require a different base design than a large, rectangular tabletop.
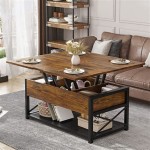
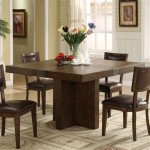
Common dining table base styles include: four-legged designs, pedestal bases, trestle bases, and metal bases. Four-legged designs are the most straightforward to construct, offering stability and ample legroom. Pedestal bases, typically featuring a single central support or a cluster of supports, create a more open and modern aesthetic. Trestle bases, characterized by two supports connected by a stretcher, provide a rustic and traditional look. Metal bases offer a contemporary aesthetic and can be fabricated using welding techniques.
Once the design and dimensions have been finalized, it is crucial to create a detailed plan or blueprint. This plan should include precise measurements of all components, the joinery methods to be used, and a detailed list of materials. A scaled drawing or 3D model can be helpful for visualizing the finished product and identifying potential design flaws before construction begins.
Key Considerations Before Starting
Before commencing the actual construction, it is essential to address several key considerations:
- Load-Bearing Capacity: The base must be strong enough to support the weight of the tabletop and any items placed on it. Calculate the estimated weight and select materials and joinery methods that can handle the load safely.
- Stability: The base should be stable and resistant to tipping or wobbling. A wide stance and secure joinery are crucial for achieving stability.
- Legroom: The design should provide adequate legroom for diners. The base should not obstruct the seating area or make it uncomfortable to sit at the table.
- Aesthetics: The base should complement the style of the tabletop and the overall décor of the dining room. Consider the color, texture, and finish of the materials used.
- Material Selection: Choose materials that are durable, aesthetically pleasing, and suitable for the intended use. Common materials include solid hardwoods (oak, maple, walnut), softwood (pine), and metal (steel).
- Joinery Methods: Select appropriate joinery methods based on the strength requirements and aesthetic preferences. Common joinery methods include mortise and tenon, dowel joints, biscuit joints, pocket-hole screws, and metal fasteners.
Careful consideration of these factors will contribute to the successful construction of a functional and visually appealing dining table base.
After the plan is complete, gather the necessary materials and tools. The tools required will vary depending on the complexity of the design and the chosen joinery methods, but generally include a measuring tape, saw (circular saw, table saw, or hand saw), drill, screwdriver, sandpaper, clamps, and safety equipment (eye protection, ear protection, dust mask).
Begin by cutting the components of the base to the specified dimensions. Accurate cutting is essential for achieving a precise and well-fitting structure. Use a sharp saw blade and take your time to ensure clean and straight cuts. For angled cuts, use a miter saw or a protractor to guide the saw.
Once the components are cut, proceed with assembling the base using the chosen joinery methods. Apply wood glue to the mating surfaces and clamp the pieces together until the glue has dried completely. For mortise and tenon joints, ensure a tight and precise fit. For dowel joints, use a drilling jig to ensure accurate hole placement. For pocket-hole screws, use a pocket-hole jig to create angled holes for secure fastening.
Common Joinery Techniques for Table Bases
Several joinery techniques are commonly employed in constructing table bases, each offering varying degrees of strength and aesthetic appeal:
- Mortise and Tenon: This traditional joint involves a projecting tenon that fits snugly into a corresponding mortise (hole). It is known for its exceptional strength and durability.
- Dowel Joints: Dowels are small cylindrical pieces of wood that are inserted into aligned holes in two pieces of wood. They provide added strength and alignment to the joint.
- Biscuit Joints: Biscuits are oval-shaped wafers of compressed wood that are inserted into slots cut into the mating surfaces. They provide alignment and increase the gluing surface area.
- Pocket-Hole Screws: Pocket-hole screws are self-tapping screws that are driven into angled holes drilled into the back of a piece of wood. They provide a quick and easy way to create strong joints.
- Metal Fasteners: Screws, bolts, and metal brackets can be used to reinforce joints or to connect metal components to wooden components.
The selection of joinery techniques should be based on the design requirements, the material properties, and the skill level of the builder.
After the base is assembled, sand all surfaces to remove any sharp edges or imperfections. Start with a coarse grit sandpaper (80 or 100 grit) and gradually progress to finer grits (120, 150, 180, or 220 grit) for a smooth finish. Pay particular attention to the corners and edges, as these are more prone to splintering.
Once the sanding is complete, apply a finish to protect the wood and enhance its appearance. Common finishes include polyurethane, varnish, lacquer, oil, and wax. Choose a finish that is appropriate for the type of wood and the intended use of the table. Follow the manufacturer's instructions carefully when applying the finish. Apply multiple coats of finish, allowing each coat to dry completely before applying the next.
For metal bases, welding is a common fabrication method. Welding requires specialized equipment and skills. The metal components are joined together by melting and fusing the metal at the seams. After welding, the seams are typically ground smooth and then coated with a protective finish, such as powder coating or paint.
Attaching the tabletop to the base is a crucial step. There are several methods for attaching the tabletop, including using screws, metal brackets, or wood cleats. Screws can be driven directly through the tabletop into the base, but this method is not recommended for solid wood tabletops, as it can restrict wood movement and cause cracking. Metal brackets provide a more secure and flexible attachment method. Wood cleats are strips of wood that are attached to the underside of the tabletop and then screwed to the base.
Ensuring Stability and Preventing Wobbling
A stable and wobble-free table base is essential for comfortable dining. Several techniques can be employed to ensure stability:
- Wide Stance: A wider base stance provides greater stability. Ensure that the legs or supports are spaced far enough apart to prevent tipping.
- Leveling Feet: Adjustable leveling feet can compensate for uneven floors. Install leveling feet on the bottom of the legs or supports to ensure that the table sits level.
- Diagonal Bracing: Diagonal braces can be added to the base to increase rigidity and prevent racking (sideways movement).
- Solid Joinery: Strong and well-fitted joints are crucial for stability. Use appropriate joinery methods and ensure that all connections are secure.
- Proper Weight Distribution: Distribute the weight of the tabletop evenly across the base. Avoid placing heavy objects on one side of the table.
Addressing these factors will significantly contribute to the stability and longevity of the dining table.
Before using the table, inspect the base thoroughly for any loose connections or imperfections. Tighten any screws or bolts that may have loosened during assembly. Apply a furniture polish or wax to protect the finish and enhance its appearance. The finished dining table base will be a testament to the craftsmanship and attention to detail invested in the project.
Building a dining table base is a challenging but rewarding project. With careful planning, precise cutting, and secure joinery techniques, one can create a beautiful and functional piece of furniture that will last for years to come. The dining table will be a focal point of the dining room, providing a space for family and friends to gather and share meals.

How To Build A H Leg Dining Table Youtube

Diy Dining Table Build It For 75 Pine And Poplar

Diy X Base Circular Dining Table Jaime Costiglio

How To Build A Farmhouse Dining Table Green With Decor

Diy X Base Dining Table Build Plans Sawdust Girl

Outdoor Table With X Leg And Herringbone Top Free Plans

If You Give Your Mom Some Built Ins She S Going To Want A Table Too Diy X Base Dining

H Leg Dining Table Rogue Engineer

How To Build A Farmhouse Dining Table Part 2 Base And Legs

How To Build A Dining Table Diy